docker
安装
私有registry服务搭建:harbor配置
安装脚本
Ubuntu
# 先安装docker
/bin/bash -c "$(curl https://get.docker.com)" \
  && sudo systemctl --now enable docker

# 随后安装nvidia-docker2
# 配置apt仓库
curl -fsSL https://nvidia.github.io/libnvidia-container/gpgkey | sudo gpg --dearmor -o /usr/share/keyrings/nvidia-container-toolkit-keyring.gpg \
  && curl -s -L https://nvidia.github.io/libnvidia-container/stable/deb/nvidia-container-toolkit.list | \
    sed 's#deb https://#deb [signed-by=/usr/share/keyrings/nvidia-container-toolkit-keyring.gpg] https://#g' | \
    sudo tee /etc/apt/sources.list.d/nvidia-container-toolkit.list

sudo sed -i -e '/experimental/ s/^#//g' /etc/apt/sources.list.d/nvidia-container-toolkit.list

# 安装nvidia-docker2包
sudo apt update
sudo apt install -y nvidia-container-toolkit

# Configure the container runtime by using the `nvidia-ctk` command:
sudo nvidia-ctk runtime configure --runtime=docker
sudo nvidia-ctk runtime configure --runtime=containerd --set-as-default

# 重启docker服务
sudo systemctl restart docker

DOCKER_COMPOSE_VERSION=2.29.7
if which docker-compose &>/dev/null && [ $(docker-compose --version | sed "s/.*v\([0-9]\+\.[0-9]\+\.[0-9]\+\)/\1/") == ${DOCKER_COMPOSE_VERSION} ]; then
  echo "Found docker-compose=${DOCKER_COMPOSE_VERSION}"
else
  echo "not found docker-compose=${DOCKER_COMPOSE_VERSION}, going to install..."
  wget https://github.com/docker/compose/releases/download/v${DOCKER_COMPOSE_VERSION}$/docker-compose-linux-x86_64
  sudo chmod a+x docker-compose-linux-x86_64
  sudo mv docker-compose-linux-x86_64 /usr/local/bin/docker-compose
fi
设置存储路径
// /etc/docker/daemon.json
{
  "data-root": "/home/docker/data-root",
  // 设置容器默认用户限制
  "default-ulimits": {
    "nofile": {
      "Name": "nofile", // 限制每个进程可以打开的最大文件描述符数量。
      "Hard": 64000,
      "Soft": 64000
    }
  }
}

// 随后将/var/lib/docker中的数据拷贝过去
指令
常用指令
docker network lsdocker logs <container_name_or_id>docker login <registry-url># 查看所有状态的容器
docker ps -a
# filter:
# status = running | exited | paused | created
# ancestor = <镜像标签>
docker ps --filter "status=running"# 显示含特定标签的镜像,注意*必须在第一个"/" 之后,否则匹配不到,不知道什么原因
docker images --filter "reference=<repo>/*"
# 批量删除
docker rmi $(docker images --filter "reference=<repo>/*" )plugin
# 安装docker插件 --alias用于推送
docker plugin install grafana/loki-docker-driver:2.9.2 --alias inner-harbor.faceunity.com/alg/grafana/loki-docker-driver:2.9.2 --grant-all-permissions

# 推送插件到self-hosted docker registry
docker plugin push inner-harbor.faceunity.com/alg/grafana/loki-docker-driver:2.9.2

# 随后可以从harbor上重新安装并且定义--alias loki
docker plugin install inner-harbor.faceunity.com/alg/grafana/loki-docker-driver:2.9.2 --alias loki --grant-all-permissions

# 查看插件
docker plugin ls

# 更新docker driver client
docker plugin disable loki --force
docker plugin upgrade loki grafana/loki-docker-driver:2.9.2 --grant-all-permissions
docker enable loki
sudo systemctl restart docker

# 卸载
docker plugin disable loki --force
docker plugin rm loki
buildx
以下面的指令为例子:
DOCKER_BUILDKIT=1 docker buildx build --rm --push -t ${CONTAINER_PATH}:${CI_BUILD_TAG} .DOCKER_BUILDKIT=1:启用 Docker BuildKit 构建引擎,Docker BuildKit 是 Docker 的下一代构建引擎,相比传统的构建方式,它具有更高的性能、更好的缓存机制以及更丰富的功能(如并行构建、多阶段构建优化等)。docker buildx build:使用 Docker Buildx 构建镜像,docker buildx是 Docker 的一个插件,用于扩展 Docker 的构建功能,支持多平台构建(如构建 ARM、x86 等不同架构的镜像)。--rm:构建完成后删除中间层镜像。在 Docker 构建过程中,会生成一些中间层镜像(Intermediate Layers)。--rm参数会在构建完成后自动删除这些中间层镜像,以节省磁盘空间。--push:构建完成后将镜像推送到镜像仓库。-t ${CONTAINER_PATH}:${CI_BUILD_TAG}:指定镜像的名称和标签。.:指定构建上下文的路径。
prune
这个命令用于清理存储空间
# - 删除所有已停止的容器。
# - 删除所有未使用的网络。
# - 删除所有虚悬镜像(<none> 镜像)。
# - 删除所有构建缓存。
# 带上-a会清理包含不用的镜像。
docker system prune

# 清理虚悬镜像,也就是标签都显示为 <none>:<none> 的镜像。
# 它们通常是因为你重新 build 了同名镜像后,旧镜像层失去标签后留下的。
# 它们已经没用了,也不属于你想要“保留”的范畴
# 带上-a会删除所有没有正在用的镜像
docker image prune

# 清理无用的数据卷(Volumes)—— 需谨慎
# 这是释放空间最明显的操作,但也是最危险的。很多时候,MySQL 或 Redis 的数据都存在数据卷里。
docker volume prune

# 清理已经停止的容器(Stopped Containers)
# 如果你有很多执行完就没删掉的容器(比如测试用的),这些容器的“读写层”可能积攒了很多垃圾文件。
docker container prune
Dockerfile
ENTRYPOINT和CMD
# 用于配置容器启动时的命令,与CMD指令不同的是 ENTRYPOINT更有强制性
# 无法在docker run的时候覆盖,也就是无论你传了什么参数,ENTRYPOINT都会完整执行,除非传入--entrypoint参数进行覆盖。
# 语法: ENTRYPOINT command param1 param2
# 示例:
ENTRYPOINT ["executable", "param1", "param2"]

# 而CMD则是可以被传入参数覆盖
# 比如:
CMD ["echo", "hello", " world"]
# 当执行以下命令时会打印"hello world"
docker run your_image

# 当执行以下命令时则会打印: "i am test"
docker run your_image echo i am test

# 当然ENTRYPOINT和CMD可以配合使用
# ENTRYPOINT定义主命令,CMD定义默认的且可覆盖的参数
执行拥有.bashrc环境的bash
ENTRYPOINT ["bash", "-c", "source /root/.bashrc && some_command"]体积问题
- 尽量
RUN一行指令,RUN的次数尽量少 - 下载、编译、安装了库之后,要一行内执行结束(下载->编译->安装->删除安装包)
DOCKER_BUILDKIT=1据说有帮助,还没用过。
COPY指令路径
COPY指令的路径是相对于context的。
CI Runner SSH问题
对于CI Runner,如何处理ssh的问题。
# install gitlab-runner
RUN curl -L https://packages.gitlab.com/install/repositories/runner/gitlab-runner/script.deb.sh | bash && \
  apt install -y --no-install-recommends gitlab-runner
RUN apt install -y --no-install-recommends lsb-release openssh-client

# install docker-ce-cli
RUN curl -fsSL https://download.docker.com/linux/ubuntu/gpg | apt-key add - && \
  echo "deb [arch=amd64] https://download.docker.com/linux/ubuntu $(lsb_release -cs) stable" | tee /etc/apt/sources.list.d/docker.list > /dev/null && \
  apt update && apt install -y docker-ce-cli && rm -rf /var/lib/apt/lists/*

WORKDIR /root

ARG GITLAB_HOST
ARG GITLAB_TOKEN
ENV GITLAB_HOST=${GITLAB_HOST}
ENV GITLAB_TOKEN=${GITLAB_TOKEN}
ENV RUNNER_DESCRIPTION="fugan-ci-runner"
ENV RUNNER_TAG_LIST="linux,cuda,cudnn"
ENV RUNNER_EXECUTOR="shell"
RUN gitlab-runner register --non-interactive \
  --url "$GITLAB_HOST" \
  --registration-token "$GITLAB_TOKEN" \
  --description "$RUNNER_DESCRIPTION" \
  --tag-list "$RUNNER_TAG_LIST" \
  --executor "$RUNNER_EXECUTOR"

# Copy ssh-key
RUN mkdir -p /root/.ssh
COPY ./ssh-key/* /root/.ssh/
RUN chmod 600 /root/.ssh/id_rsa && ssh-keyscan ${GITLAB_HOST} >> /root/.ssh/known_hosts

ENTRYPOINT ["gitlab-runner", "run"]
两阶段build
# 第一阶段 builder
FROM inner-harbor.faceunity.com/alg/node:20 AS builder
RUN npm install -g pnpm

WORKDIR /app

# pnpm install first
COPY package.json .
RUN pnpm install --registry=https://registry.npmmirror.com

# then copy the source code
COPY . .

# 安装依赖包,并编译生产环境
RUN npx prisma generate && pnpm run build

# 第二阶段,部署生产环境,第一阶段的东西用于拷贝,build image的时候不会保留
FROM inner-harbor.faceunity.com/alg/node:20-slim
RUN npm install -g pnpm
RUN apt update && apt install -y ffmpeg subversion locales fonts-arphic-uming && rm -rf /var/lib/apt/lists/*

WORKDIR /app
COPY --from=builder /app/package.json ./
COPY --from=builder /app/pnpm-lock.yaml ./
COPY --from=builder /app/.next  ./.next
COPY --from=builder /app/public ./public
COPY --from=builder /app/prisma ./prisma
RUN pnpm install --prod --frozen-lockfile --registry=https://registry.npmmirror.com
# Copy the built cpy-feature
COPY --from=builder /app/node_modules/.pnpm/cpu-features@0.0.10/node_modules/cpu-features/build/Release/cpufeatures.node ./node_modules/.pnpm/cpu-features@0.0.10/node_modules/cpu-features/build/Release/cpufeatures.node
COPY ./cron-jobs.js ./

RUN npx prisma generate
RUN npm install -g pm2

RUN sed -i '/zh_CN.UTF-8/s/^# //g' /etc/locale.gen && locale-gen
ENV LANG=zh_CN.UTF-8
ENV LANGUAGE=zh_CN:zh
ENV LC_ALL=zh_CN.UTF-8

CMD ['/bin/sh', '-c', "pm2 start cron-jobs.js --name distribute_task && pnpm start"]
python环境安装
FROM nvidia/cuda:12.8.1-runtime-ubuntu22.04

ENV DEBIAN_FRONTEND=noninteractive

RUN apt update -y
RUN apt install -y --no-install-recommends curl software-properties-common
RUN add-apt-repository ppa:deadsnakes/ppa && apt-get update && \
    apt-get install -y --no-install-recommends python3.12 python3.12-dev python3.12-venv && \
    curl -sS https://bootstrap.pypa.io/get-pip.py | python3.12 && \
    update-alternatives --install /usr/bin/python3 python3 /usr/bin/python3.12 1 && \
    update-alternatives --install /usr/bin/pip3 pip3 /usr/local/bin/pip 1 && \
    rm -rf /var/lib/apt/lists/*
–mount=type=cache
通常对于对于npm、uv、pip这种包管理器的项目,每次包配置发生变化,同步包的那一层就要重新跑,如果有些包很大的话会很耗时。可以使用RUN --mount=type=cache来对某些路径进行缓存,减少重跑的代价。
# 对于uv来说,可以这样:
RUN --mount=type=cache,target=/root/.cache/uv . /root/.local/bin/env && uv sync
--mount=type=cache 创建的缓存默认存储在 Docker 的内部构建缓存区域。通常在 /var/lib/docker/buildkit/cache.db 或 /var/lib/docker/cache 下的相关目录。这是一个由 BuildKit 自己管理的、经过优化的存储结构,不是简单的文件拷贝。
- 首次构建:
- Docker
BuildKit会创建一个空的缓存卷。 - 这个空的缓存卷会被挂载到构建容器的
/root/.cache/uv目录。 uv sync运行时,它会下载 torch, cupy 等包,并将它们的 wheel 文件存入/root/.cache/uv。- 当这个
RUN层执行完毕后,BuildKit会将这个缓存卷的内容与该 Dockerfile 的这一行命令进行关联,并将其保存在 Docker 的内部缓存存储中。
- Docker
- 后续构建 (即使 uv.lock 改变了):
- 当你再次运行
docker build时,BuildKit会看到这一行RUN --mount...命令。 - 它会根据一个唯一的 key (通常由 Dockerfile 内容、构建上下文等决定) 找到上一次构建时保存的那个缓存卷。
- 它会将这个包含了旧的 wheel 文件的缓存卷再次挂载到新构建容器的
/root/.cache/uv目录。 - 现在,当
uv sync再次运行时,它会发现/root/.cache/uv目录里已经有很多它需要的包了,于是它会跳过下载这些包,直接使用缓存中的文件。对于新增加的包,它会下载并添加到这个缓存目录中。 - 构建结束后,这个被更新了的缓存卷会再次被保存,供下下次使用。
- 当你再次运行
docker-compose
注意:docker-compose中定义的环境变量只作用于runtime阶段,不会在build阶段生效
docker-compose文件解析
image: 既可以指定从哪个镜像创建容器,也可以指定build的镜像名。build: 指定从dockerfile文件编译的信息context:指定Dockerfile的context路径,Dockerfile的COPY指令只能拷贝context下的文件。dockerfile:指定Dockerfile文件,路径相对于context执行的路径。
tty:允许CMD为/bin/bash的时候容器直接hold住,而不是直接退出。shm_size:用于设置容器/dev/shm共享内存的大小docker-compose.yml文件中可使用系统环境变量使用${HOME}引用。- 另外
docker-compose.yml目录下可以存在一个.env文件用于定义docker-compose.yml中的环境变量。 profiles(数组):根据命令行参数--profile,或者环境变量COMPOSE_PROFILES来决定是否启动该服务的参数。environment(数组):容器内部执行的环境变量。env_file(数组):环境变量定义文件。
模板
version: '3.3'
services:
  aimet-controlnet:
    container_name: aimet-dev-torch-gpu
    image: artifacts.codelinaro.org/codelinaro-aimet/aimet-dev:latest.torch-gpu
    environment:
	    - TZ=Asia/Shanghai
	    - NVIDIA_VISIBLE_DEVICES=all
	    - NVIDIA_DRIVER_CAPABILITIES=compute,utility,video # all
	env_file:
		- .env
    deploy:
      resources:
        reservations:
          devices:
          - driver: nvidia
            device_ids: ['0', '3'] # count: all
            capabilities: # [gpu]
              - compute
              - utility
              - graphics
              - display
              - video # 对于英伟达的硬编解码器很重要
    ulimits:
      core: -1
    ipc: host
    shm_size: 8G
    cap_add:
      - SYS_PTRACE
    security_opt:
      - seccomp=unconfined
    restart: "no"
    network_mode: host
    tty: true
    working_dir: ${PWD}
    volumes:
      - ${PWD}:${PWD}
    command: sleep infinity
创建network
docker-compose创建network:
version: 3.9
networks:
	mynetwork:
		driver: bridge

services:
	webapp:
		image: nginx:latest
		networks:
			- mynetwork
		ports:
			- 8080:80
命令行创建:
docker network create --driver [bridge, overlay, host, macvlan] NETWORK_NAME从Dockerfile中构建
FROM ubuntu:bionic
ARG USER_NAME
ARG USER_UID
ARG USER_GID

USER root

RUN apt-get update && apt-get install --no-install-recommends -y vim sudo \
    && apt-get install --no-install-recommends -y libatomic1

RUN groupadd -g $USER_GID $USER_NAME
RUN useradd -rm -d /home/$USER_NAME -s /bin/bash -g $USER_NAME -G sudo $USER_NAME -u $USER_UID

RUN echo $USER_NAME:fu123456 | chpasswd

RUN echo "%users ALL = (ALL) NOPASSWD: ALL" >> /etc/sudoers

WORKDIR /home/$USER_NAME
USER $USER_NAMEversion: '3'
services:
self_host:
build:
context: .
dockerfile: Dockerfile
args:
- USER_NAME=faceunity
- USER_UID=1000
- USER_GID=1000
network_mode: bridge
tty: true
volumes:
- /home/faceunity:/home/faceunity
command: /bin/bash开启GPU支持
Compose services can define GPU device reservations if the Docker host contains such devices and the Docker Daemon is set accordingly. For this, make sure you install the prerequisites if you haven’t already done so.
The examples in the following sections focus specifically on providing service containers access to GPU devices with Docker Compose. You can use either docker-compose or docker compose commands. For more information, see Migrate to Compose V2.
Enabling GPU access to service containers
GPUs are referenced in a compose.yml file using the device attribute from the Compose Deploy specification, within your services that need them.
This provides more granular control over a GPU reservation as custom values can be set for the following device properties:
capabilities. This value specifies as a list of strings (eg.capabilities: [gpu]). You must set this field in the Compose file. Otherwise, it returns an error on service deployment.count. This value, specified as an integer or the valueall, represents the number of GPU devices that should be reserved (providing the host holds that number of GPUs). Ifcountis set toallor not specified, all GPUs available on the host are used by default.device_ids. This value, specified as a list of strings, represents GPU device IDs from the host. You can find the device ID in the output ofnvidia-smion the host. If nodevice_idsare set, all GPUs available on the host are used by default.driver. This value is specified as a string, for exampledriver: 'nvidia'options. Key-value pairs representing driver specific options.
Important
You must set the
capabilitiesfield. Otherwise, it returns an error on service deployment.
countanddevice_idsare mutually exclusive. You must only define one field at a time.
For more information on these properties, see the Compose Deploy Specification.
Example of a Compose file for running a service with access to 1 GPU device
services:
  test:
    image: nvidia/cuda:12.3.1-base-ubuntu20.04
    command: nvidia-smi
	environment:
	    - TZ=Asia/Shanghai
	    - NVIDIA_VISIBLE_DEVICES=all
	    - NVIDIA_DRIVER_CAPABILITIES=compute,utility,video
    deploy:
      resources:
        reservations:
          devices:
            - driver: nvidia
              count: 1
              capabilities: [gpu]
On machines hosting multiple GPUs, the device_ids field can be set to target specific GPU devices and count can be used to limit the number of GPU devices assigned to a service container.
You can use count or device_ids in each of your service definitions. An error is returned if you try to combine both, specify an invalid device ID, or use a value of count that’s higher than the number of GPUs in your system.
$ nvidia-smi
+-----------------------------------------------------------------------------+
| NVIDIA-SMI 450.80.02    Driver Version: 450.80.02    CUDA Version: 11.0     |
|-------------------------------+----------------------+----------------------+
| GPU  Name        Persistence-M| Bus-Id        Disp.A | Volatile Uncorr. ECC |
| Fan  Temp  Perf  Pwr:Usage/Cap|         Memory-Usage | GPU-Util  Compute M. |
|                               |                      |               MIG M. |
|===============================+======================+======================|
|   0  Tesla T4            On   | 00000000:00:1B.0 Off |                    0 |
| N/A   72C    P8    12W /  70W |      0MiB / 15109MiB |      0%      Default |
|                               |                      |                  N/A |
+-------------------------------+----------------------+----------------------+
|   1  Tesla T4            On   | 00000000:00:1C.0 Off |                    0 |
| N/A   67C    P8    11W /  70W |      0MiB / 15109MiB |      0%      Default |
|                               |                      |                  N/A |
+-------------------------------+----------------------+----------------------+
|   2  Tesla T4            On   | 00000000:00:1D.0 Off |                    0 |
| N/A   74C    P8    12W /  70W |      0MiB / 15109MiB |      0%      Default |
|                               |                      |                  N/A |
+-------------------------------+----------------------+----------------------+
|   3  Tesla T4            On   | 00000000:00:1E.0 Off |                    0 |
| N/A   62C    P8    11W /  70W |      0MiB / 15109MiB |      0%      Default |
|                               |                      |                  N/A |
+-------------------------------+----------------------+----------------------+
Access specific devices
To allow access only to GPU-0 and GPU-3 devices:
services:
  test:
    image: tensorflow/tensorflow:latest-gpu
    command: python -c "import tensorflow as tf;tf.test.gpu_device_name()"
    deploy:
      resources:
        reservations:
          devices:
          - driver: nvidia
            device_ids: ['0', '3'] # 或者count: all
            capabilities: [gpu]
导出/加载 image
# list 镜像
docker images

# 导出 某个镜像
docker save -o saved_image.tar <镜像名称>:<镜像tag>

# 加载 某个镜像
docker load -i saved_image.tar
常用命令
docker-compose up
根据当前目录或者最近上层目录下的docker-compose.yml文件启动容器。添加-d参数可以后台运行。
docker-compose logs
查看当前docker-compose up启动后的日志。
docker-compose run
# 执行一次服务(service),覆盖command
# --rm 运行完之后自动删除run产生的orphan
docker-compose run --rm <service name in docker-compose.yml> <command>
docker-compose build
# 如果docker-compose.yml是从Dockerfile创建的
# 这个指令只进行image的编译
docker-compose build --build-arg YOUR_ARG1="something" \
					 --build-arg YOUR_ARG2="something" \
					 <service_name>

# docekrfile参数似乎无法通过命令行参数传入,可以使用sed指令手动修改
sed -i "s/dockerfile:.*/dockerfile: Dockerfile.new/" docker-compose.yml
问题
外部真实IP透传
服务器如果使用了fail2ban等工具来防止恶意访问的话,通常是需要外部访问的真实IP的。
但是如果使用容器的network_mode: bridge然后加上ports: <external_port>:<internal_port>进行端口映射的话,docker实际上是使用iptables规则,将主机的端口映射到了容器内部的端口,这通常会导致iptables使用DNAT(目的地址转换)规则将流量转发到容器的内部IP和端口,由于NAT转发,容器内部看到的客户端源地址是docker网桥的IP(比如network_mode: bridge使用的是默认网桥docker0 172.17.0.1),而不是外部的真实IP。
通常解决办法是使用network_mode: host,这样最直接,但是容器多了之后,会让host主机的网络环境异常混乱。
还有一种方式是配置一个前端的nginx反向代理服务器(可以使用docker,network_mode: host模式),进行统一调度。然后其他容器服务均使用固定的虚拟网络IP如下,这样子相当于该容器服务模拟了一个子网下的主机。
networks:
	gitea-subnet:
		name: gitea-subnet
		driver: bridge
		ipam:
			config:
				- subnet: 172.111.20.0/24

services:
	gitea:
		...
		networks:
			gitea-subnet:
				ipv4_address: 172.111.20.10
...随后nginx反向代理服务器的proxy_pass直接填该服务的虚拟子网IP和port即可,这样外部的真实IP既能透传到容器内,且不会造成导出都是network_mode: host的容器的情况。
Dockerfile中COPY失败
如果文件存在的话,并且在Dockerfile的上下文环境中,则需要检查.dockerignore是否包含了该文件。
docker环境中编译opencv支持videoio
除了安装ffmpeg等必要的库之外,需要安装pkg-config,用于搜索这些库
apt install pkg-configdocker build时卡在时区选择
# 添加这三行提前配置时区,并且禁用交互式选项
ENV DEBIAN_FRONTEND=noninteractive
ENV TZ=Asia/Shanghai
RUN ln -fs /usr/share/zoneinfo/$TZ /etc/localtime && echo $TZ > /etc/timezone
# 安装时区软件
RUN apt update && apt install -y --no-install-recommend tzdata

# 最后在run的时候再去映射 /etc/timezone /etc/localtime
adb device 透传
首先docker-compose中增加devices和priviledged
...
    privileged: true
    cap_add:
        - SYS_ADMIN
    volumes: # 这里注意使用devices似乎不生效
      - /dev/bus/usb:/dev/bus/usb
...
随后杀掉host的adb server:
# 这是因为adb device不能同时连接多个server
adb kill-server最后启动docker:
docker-compsoe up -d
# 进入docker中
docker exec -it container_name /bin/bash

# 查看devices, 正常情况下就可以看到了
adb deivces
docker-compose devices invalid
当docker-compose 出现 devices字段invalid的时候,尝试去更新docker-compose版本: 从https://github.com/docker/compose/releases 下载对应平台的二进制文件 放到/usr/bin/ 中,并且改名为docker-compose并且赋予a+x的权限即可。
网络问题
国内镜像加速
对于国内加速镜像,直接设置镜像地址就好了: 编辑/etc/docker/daemon.json添加:
{
    "registry-mirrors": ["https://docker.mirrors.ustc.edu.cn"]
}
代理
参考链接 docker pull 和 docker build/docker run 使用代理的方式不同
docker image相关代理
docker pull/push/login等的代理被 systemd 接管,所以需要设置 systemd:
sudo vim /etc/systemd/system/docker.service.d/http-proxy.conf写入:
# NO_PROXY的通配符是. 也就是.insvc.cn
# 另外有些应用会检测no_proxy,所以这里都写了
[Service]
Environment="HTTP_PROXY=address_to_your_http_proxy"
Environment="HTTPS_PROXY=address_to_your_http_proxy"
Environment="NO_PROXY=localhost;127.0.0.1,.kaihang.net"
Environment="no_proxy=localhost;127.0.0.1,.kaihang.net"
随后重启服务:
sudo systemctl daemon-reload
sudo systemctl restart docker

# 查看环境设置的环境变量
sudo systemctl show --property=Environment docker
至此,docker pull就会使用代理了。
docker build/run 代理
build 镜像时使用代理 在 build 时添加 –build-arg 参数来设置生成镜像时使用的环境变量
docker build --build-arg http_proxy=http://172.17.0.1:8123 --build-arg https_proxy=http://172.17.0.1:8123 -t image_name .这里需要注意的是 ip 地址用了默认虚拟网卡docker0 的地址172.17.0.1,因为build的时候network参数默认为bridge,即docker内部会使用这个网段,因为要访问到宿主机的代理只能这样访问; 另外,也可以设置参数–network=host 来直接和宿主机共用网络,就能直接使用127.0.0.1来访问到宿主机了
设置 docker 全局代理
设置方法参考官方文档: https://docs.docker.com/network/proxy/
注意新版和旧版本(17.07以前)设置方法不一样,比旧版更简单而且不需要重启服务,网上文章基本都是针对旧版本的,可能未来又变化了
以及这种设置方法只对 build 和 run 的容易有用, docker pull 要按照上面的方法设置。
// vim ~/.docker/config.json
{
 "proxies":
 {
   "default":
   {
     "httpProxy": "http://<proxy_ip>:<proxy_port>",
     "httpsProxy": "http://<proxy_ip>:<proxy_port>",
     "noProxy": "localhost,.faceunity.com,insvc.cn,0.0.0.0/0,::/0"
   }
 }
}
这样设置后,build和run都会将http_proxy和https_proxy ftp_proxy变量设置成对应的代理地址,如果你在容器里面不想使用这个代理了,需要export http_proxy= 和 export https_proxy= 将两个变量设置为空。
这里使用了172.17.0.1(docker 虚拟网卡地址), 而不是127.0.0.1, 这是因为这是从容器内部的角度来看的, 容器内部要使用代理,默认情况下只能访问这个虚拟网卡的地址, 127.0.0.1是容器内部, 如果代理在宿主机, 要使用 虚拟网卡的地址才能访问到.
这个文件一旦存在, docker就会使用这里面的代理, 包括创建的容器都会使用它。 所以不需要代理了, 需要关闭代理, 就是把文件重命名一下就好了, 这点用起来确实挺麻烦,也许未来会优化体验吧。
注意, 一个容器一旦生成, 这些环境变量(http_proxy https_proxy ftp_proxy no_proxy)就会被继承到容器中, 就算把config.json删除, 这个容器依然使用创建时的环境变量,可以手动在容器内重新设置这些环境变量, 这点也挺容易让人头疼的, 一定要注意。
比如 有个镜像叫 imageA, 现在设置~/.docker/config.json也就是有代理, 然后docker run创建容器 A, 然后再重命名config.json, 创建容器B, 然后会发现无论现在怎么修改config.json, 容器A B都会使用它被创建时的代理设置,即容器A使用代理, 容器B不使用代理
群晖docker
群晖通过systemd的方式配置docker pull的代理走不通,restart指令不存在。
可以首先在web页面配置代理:
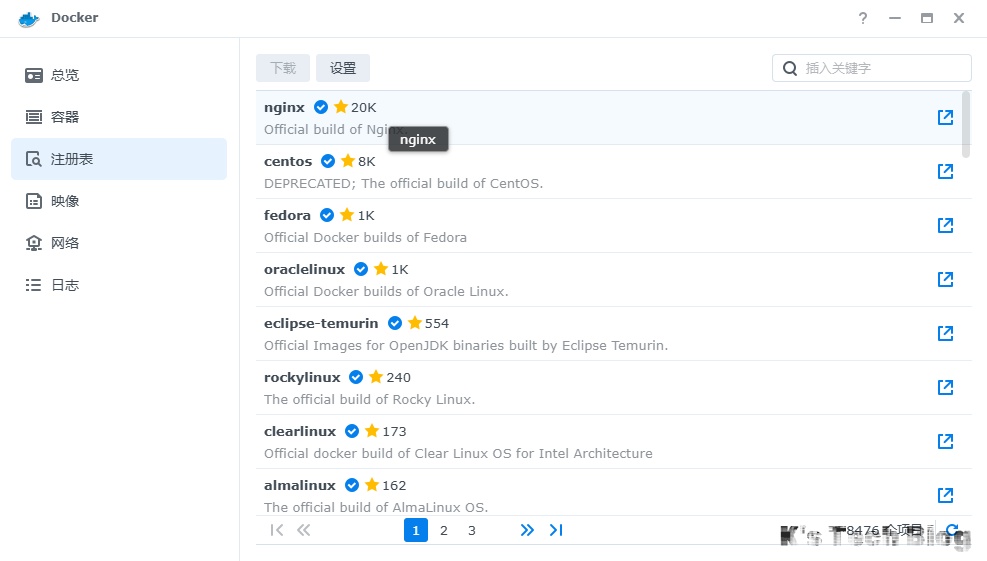
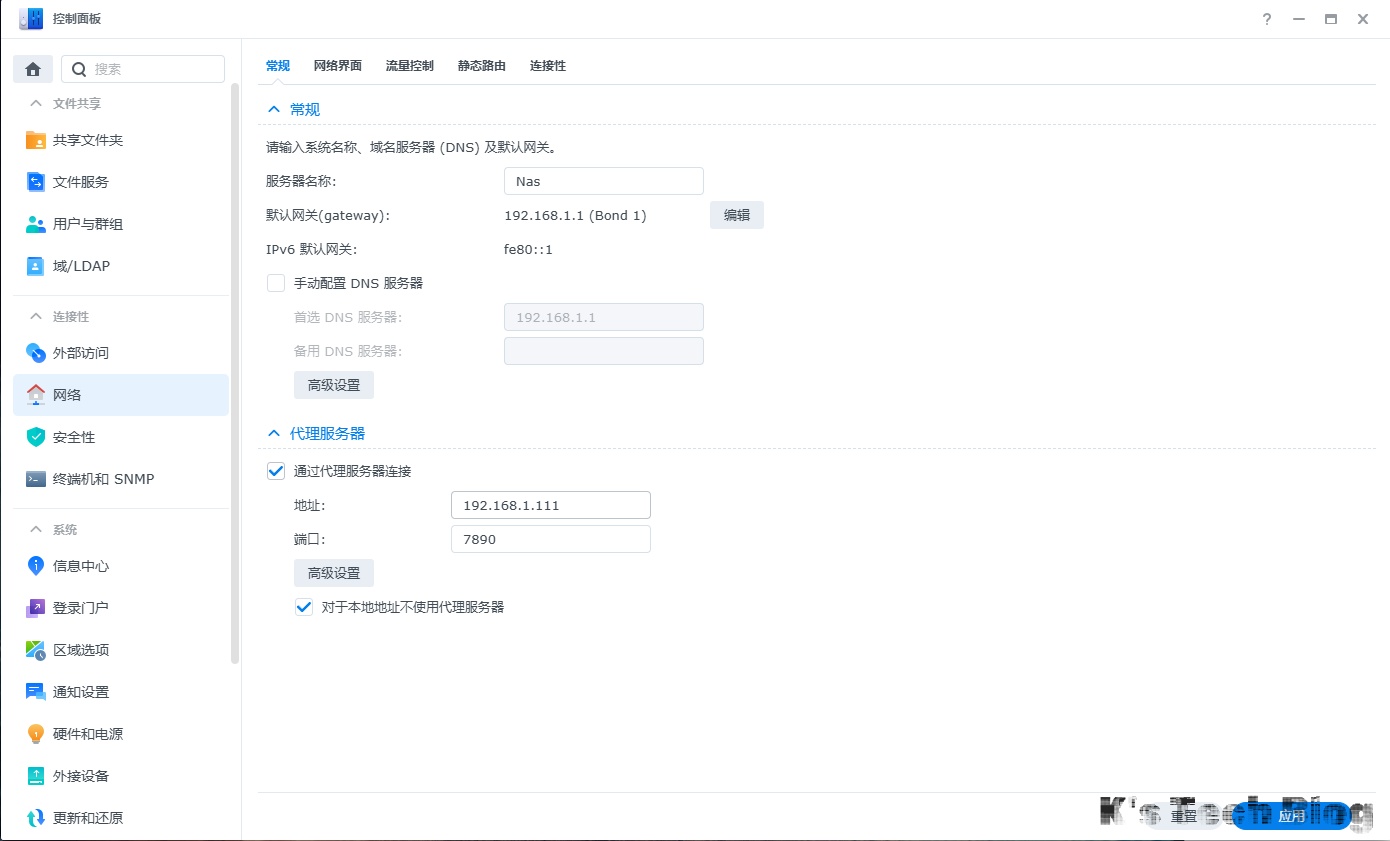 随后直接在web端的docker程序中直接拉取就行了:
build cache
清除build cache
# 清除dangling 的 build cache
docker builder prune
# 清除dangling 的 image
docker image prune
OpenGL渲染支持
host端
[[IT知识/OS/Linux/实用指令#手动开启xorg|开启xorg]],[[IT知识/OS/Linux/实用指令#渲染设备配置|渲染设备配置]]
docker端
# /etc/docker/daemon.json 添加nvidia runtime
{
  "data-root": "/home/docker/data-root",
  "default-ulimits": {
    "nofile": {
      "Name": "nofile",
      "Hard": 64000,
      "Soft": 64000
    }
  },
  "runtimes": {
    "nvidia": {
      "path": "/usr/bin/nvidia-container-runtime",
      "runtimeArgs": []
    }
  }
}

# docker-compose example,以下为需要添加的配置
version: "3"
services:
    runtime: nvidia # 启用NVIDIA容器运行时,需要配置/etc/docker/daemon.json
    deploy: # [IMPORTANT]
      resources:
        reservations:
          devices:
            - driver: nvidia
              count: all
              # or device_ids: ['0', ...] 需要包含x11使用的那块儿显卡,否则gl会失败
              capabilities: [gpu]
	environment:
      - TZ=Asia/Shanghai
      - DISPLAY=$DISPLAY # [IMPORTANT]
    volumes:
      - /tmp/.X11-unix:/tmp/.X11-unix
      - /dev/dri:/dev/dri

# 另外host端需要调用以下指令,以允许直通
# 如何命令行没有display的话执行 export DISPLAY=:1.0
xhost +local:

# 随后启动docker就可以X11环境直通了
OpenCL support
# docker-compose example,以下为需要添加的配置
version: "3"
services:
    runtime: nvidia                # 启用NVIDIA容器运行时
    deploy:
      resources:
        reservations:
          devices:
            - driver: nvidia
              count: all
              capabilities: [gpu]
	environment:
      - TZ=Asia/Shanghai
      - DISPLAY=$DISPLAY
    volumes:
      - /tmp/.X11-unix:/tmp/.X11-unix
      - /dev/dri:/dev/dri
	  - /etc/OpenCL/vendors:/etc/OpenCL/vendors # opencl的ICD机制,指向了实际加载的opencl实现,eg: libnvidia-opencl.so.1

# Dockerfile中添加
RUN apt-get install --no-install-recommends -y ocl-icd-libopencl1 ocl-icd-opencl-dev
vulkan display support
windows端首先安装好[[IT知识/OS/Windows/实用指令#支持远端X11|vcxsrv]],并且防火墙开放端口(据说是6000),随后docker-compose中配置增加vulkan的映射,和远程DISPLAY:
services:
  some_service:
	...
    environment:
      - TZ=Asia/Shanghai
      - NVIDIA_VISIBLE_DEVICES=all
      - NVIDIA_DRIVER_CAPABILITIES=all
      - DISPLAY=<your_windows_ip>:0.0
    deploy:
      resources:
        reservations:
          devices:
            - driver: nvidia
              count: all
              capabilities: [gpu]
    network_mode: host
    tty: true
    volumes:
      - /tmp/.X11-unix:/tmp/.X11-unix:ro
      - /dev/dri:/dev/dri:ro
      - /etc/OpenCL/vendors:/etc/OpenCL/vendors:ro
      - /etc/vulkan:/etc/vulkan:ro
    ...
volume权限问题
namespace remapping
这个主要是用来解决,docker container在volumes中创建的文件,owner/group为0(root),导致host端无法删除/写这些文件的问题。但目前看起来并不是一个特别好的方法,因为userns-remap只能定义一个用户,相当于其他有docker权限的用户也会使用这个用户的remapping(这是我的理解),似乎是内核层面还不能支持这个方式:Feature Reqest: One docker daemon support multiple user namespace · Issue #34474 · moby/moby (github.com)
umask
umask可以在当前的shell用户创建的文件/文件夹时,固定权限,虽然不能修改owner/group,但是凑活能用。
umask 000DNS问题
问题描述
我在ubuntu server上部署了coredns,将其当作一个本地的DNS服务器,用来解析自定义的域名,给k8s的nginx ingress用,其中ubuntu server中的配置文件如下:
#  This file is part of systemd.
#
#  systemd is free software; you can redistribute it and/or modify it
#  under the terms of the GNU Lesser General Public License as published by
#  the Free Software Foundation; either version 2.1 of the License, or
#  (at your option) any later version.
#
# Entries in this file show the compile time defaults.
# You can change settings by editing this file.
# Defaults can be restored by simply deleting this file.
#
# See resolved.conf(5) for details

[Resolve]
DNS=127.0.0.1
FallbackDNS=8.8.8.8
DNSStubListener=no # 用于避免抢占53端口
#Domains=
#LLMNR=no
#MulticastDNS=no
#DNSSEC=no
#DNSOverTLS=no
#Cache=no-negative
#DNSStubListener=yes
#ReadEtcHosts=yes更改软连接:/etc/resolv.conf -> /run/systemd/resolve/resolv.conf
随后修改:
# This file is managed by man:systemd-resolved(8). Do not edit.
#
# This is a dynamic resolv.conf file for connecting local clients directly to
# all known uplink DNS servers. This file lists all configured search domains.
#
# Third party programs must not access this file directly, but only through the
# symlink at /etc/resolv.conf. To manage man:resolv.conf(5) in a different way,
# replace this symlink by a static file or a different symlink.
#
# See man:systemd-resolved.service(8) for details about the supported modes of
# operation for /etc/resolv.conf.

nameserver 127.0.0.1
nameserver 8.8.8.8
nameserver 8.8.4.4
nameserver 119.29.29.29
overlay2
简单来说,overlay2 是 Docker 目前默认且推荐使用的“存储驱动”(Storage Driver)。它是基于 OverlayFS 联合文件系统(Union File System)实现的,具有高性能和低开销的特点。
核心概念
OverlayFS 将多个目录(称为层)挂载到同一个挂载点,形成一个单一的、统一的文件系统视图。主要包含以下几个部分:
- LowerDir:只读层。通常是镜像层(Image Layers)。可以有多个 LowerDir。
- UpperDir:读写层。通常是容器层(Container Layer)。容器启动后产生的修改都存储在这里。
- WorkDir:OverlayFS 内部使用的临时工作目录,用于原子性操作。
- Merged:最终挂载点。用户在容器内看到的统一文件系统视图,整合了 LowerDir 和 UpperDir。
读写机制
- 读(Read):
- 如果文件在 UpperDir,直接读取。
- 如果文件不在 UpperDir 但在 LowerDir,读取 LowerDir 中的文件。
- 如果两边都有,UpperDir 覆盖 LowerDir。
- 写(Write) - Copy-on-Write (CoW):
- 修改:当需要修改 LowerDir 中的文件时,Docker 并不是直接修改它(因为是只读的),而是先将该文件从 LowerDir 复制到 UpperDir,然后对 UpperDir 中的副本进行修改。
- 新建:直接在 UpperDir 中创建。
- 删除:在 UpperDir 中创建一个特殊的 “whiteout” 文件(字符设备),屏蔽 LowerDir 中的同名文件。
目录结构
通常位于 /var/lib/docker/overlay2。
- 每个镜像层和容器层都在该目录下有一个对应的子目录(以 hash 命名)。
- 使用
l目录存储短链接(Shortened Link),用于避免 mount 参数过长导致挂载失败。
常见问题
- Inode 耗尽:Overlay2 虽然共享了文件数据,但每个层的文件即使内容相同(如果硬链接优化未生效或跨层引用),在 OverlayFS 层面可能仍占用 Inode。更常见的是,如果产生大量小文件(例如 node_modules),会消耗大量 Inode 导致磁盘有空间但无法写入。
- 写性能:首次修改大文件时,需要执行 CoW 复制操作,可能会产生延迟。
工具
常用脚本
镜像迁移
# 辅助迁移镜像,imagetools、skopeo这种在网络环境好的情况
# 下可以直接用于仓库之间的拷贝,但是通常情况下,可能还是要
# 拉到本地,然后再推送。

function dcp() {
    # 1. 参数检查
    if [ $# -ne 2 ]; then
        echo -e "\033[31m[错误] 用法: dcp <源镜像:Tag> <目标镜像:Tag>\033[0m"
        echo "示例: dcp nginx:latest my-registry.com/nginx:v1"
        return 1
    fi

    local SRC_IMG=$1
    local DEST_IMG=$2

    echo -e "\033[34m[1/4] 正在拉取 x64 架构镜像: $SRC_IMG ...\033[0m"
    # 关键点:--platform linux/amd64 确保只拉取 x64 版本,忽略 arm64 等
    docker pull --platform linux/amd64 "$SRC_IMG"

    # 检查拉取是否成功
    if [ $? -ne 0 ]; then
        echo -e "\033[31m[失败] 拉取镜像失败,请检查网络或镜像名。\033[0m"
        return 1
    fi

    echo -e "\033[34m[2/4] 正在重命名 (Tag) 为: $DEST_IMG ...\033[0m"
    docker tag "$SRC_IMG" "$DEST_IMG"

    echo -e "\033[34m[3/4] 正在推送到目标仓库 ...\033[0m"
    docker push "$DEST_IMG"

    # 检查推送是否成功
    if [ $? -ne 0 ]; then
        echo -e "\033[31m[失败] 推送失败,请检查登录状态 (docker login) 或权限。\033[0m"
        # 推送失败也建议保留镜像以便排查,这里暂不自动清理
        return 1
    fi

    echo -e "\033[34m[4/4] 正在清理本地现场 ...\033[0m"
    # 删除源标签和目标标签,释放空间
    # 使用 || true 防止如果镜像原本不存在导致的报错干扰视觉
    docker rmi "$DEST_IMG" >/dev/null 2>&1
    docker rmi "$SRC_IMG" >/dev/null 2>&1

    echo -e "\033[32m[成功] 镜像搬运完成!\033[0m"
}
容器管理工具
Lazydocker
jesseduffield/lazydocker: The lazier way to manage everything docker 命令行容器管理工具,挺好用的。