Halide
官方地址:链接 Tutorial地址:链接 这里主要是讲Hexagon的Halide,同时会带有Halide原本的一些基础概念
Halide是一个被设计好用来快速编写高效的图像、数组处理代码的语言。Halide目前支持的target:
- CPU architecture:X86, ARM, MIPS, Hexagon, PowerPC, RISC-V
- Operation systems: Linux, Windows, macOS, Android, iOS, Qualcomm QuRT(DSP subsystem).
- GPU Compute APIs: CUDA, OpenCL, OpenGL Compute Shaders, Apple Metal, Microsoft Direct X12
基础概念
Execution Modes
运行模式目前有两种:
- Offload modes:这种是指Halide程序是在端侧(HLOS)的,然后有一部分pipeline想要放到DSP上运行,然后又不想处理fastRPC相关的内容,那么通过
dilate3x3.hexagon().vectorize(xi, 128)这种方式既可以将pipelinedelate3x3offload到DSP上。 - Standalone modes:这种是指Halide程序在DSP侧(也就是QuRT程序 skel.so中),直接调用就行,不需要再写
.hexagon(),dilate3x3.vectorize(xi, 128)。
Ahead-of-Time(AOT) 编译
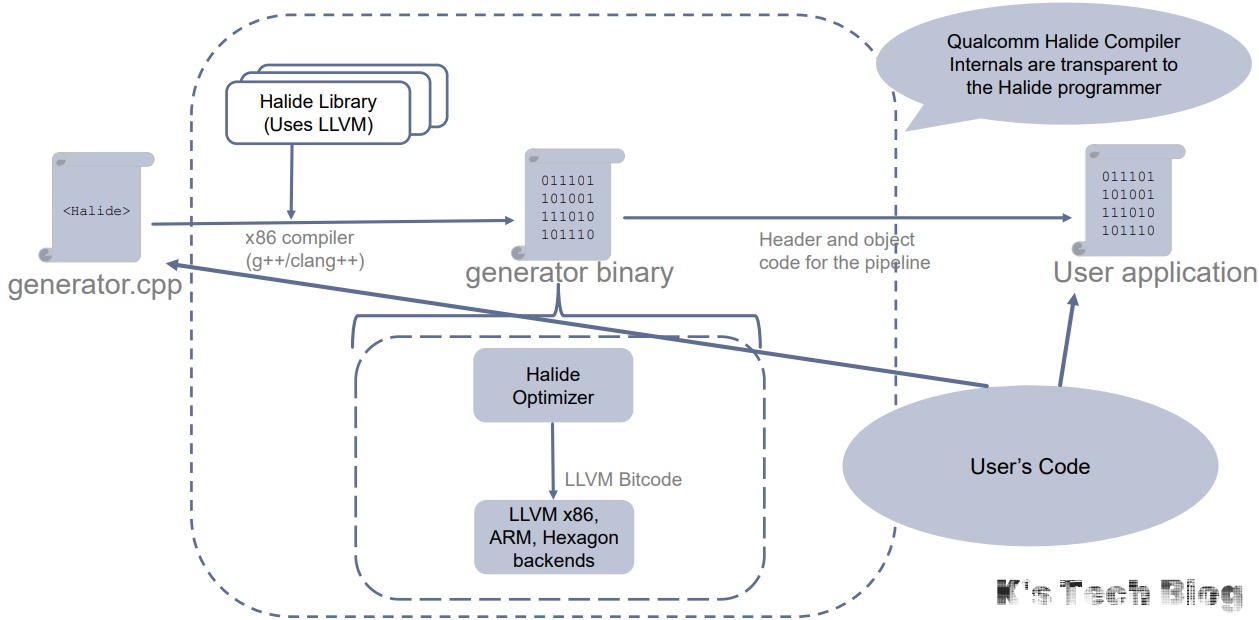
举个Hexagon Halide程序的编译流程的例子: 文件夹结构:
├── dsp
│   ├── conv3x3_run.cpp # dsp侧的函数,用来调用halide生成的函数。
│   └── print.cpp
├── halide
│   └── conv3x3_generator.cpp # 用于生成generator,随后生成$*_halide
├── host
│   └── main.cpp # CPU端调用
├── includes
│   └── conv3x3_halide.schedule.h # autotune_loop.py自动生成的文件
├── Makefile
└── rpc
    └── conv3x3.idl # 用于生成skel.c和stub.c,FastRPC接口文件
graph TD C0(hexagon-clang/++) C1(ndk clang/++) C2(linux clang/++) G_DEP(libHalide.a Halide.h GenGen.cpp) A0(qaic) A0 --> A1(conv3x3.idl) A1 --> A2(conv3x3_skel.c) A1 --> A3(conv3x3_stub.c) C0 --> A2 --> A20(libconv3x3_skel.so) C1 --> A3 --> A21(libconv3x3_stub.so) C2 --> G0(conv3x3_generator.cpp) G_DEP --> G0 G0 --> G1(conv3x3_generator) G1 --> G2(conv3x3_halide.h conv3x3_halide.o) B0(halide::autotune_loop.py 可选) G1 --> B0 G2 --> B0 B0 --> B1(conv3x3_halide.schedule.h)
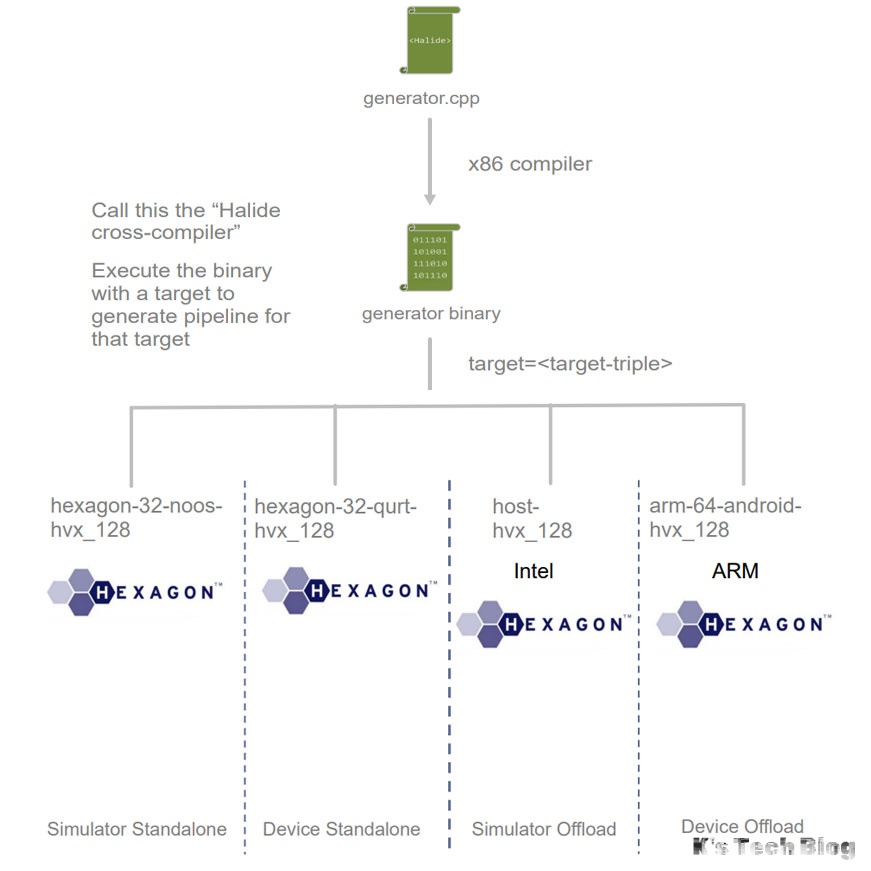
Halide target
在调用halide generator生成.o .h的时候可以设置target为(下面表格是个例子):
<host>-<bits>-<os>-<features>[-profile]
| host | arm, x86, hexagon |
|---|---|
| bits | 32, 64 |
| OS | android, qurt, noos |
| features | hvx_64, hvx_128, hvx_v62 |
-profile:可以增加halide profile的特性。
-debug:可以增加halide的日志,如果是host端(HLOS, android)的话可以通过adb logcat *:S halide:V来获取日志,如果是QuRT端的话,目前不确定是不是可以通过mini-dm抓取日志。
这里面如果要把halide编译到dsp侧的话,需要使用target qurt,以下是我第一个走通的CMake程序的generator调用部分,因为目前QuRT是32位的,所以bits只能是32:
set(HALIDE_EMIT_OPTIONS o,h,bitcode,assembly) # 表示输出.o .h .s .bc
set(HALIDE_TARGET hexagon-32-qurt-hvx)
add_custom_command(
    TARGET conv3x3_generator
    POST_BUILD
    COMMAND ${CMAKE_CURRENT_BINARY_DIR}/conv3x3_generator -g conv3x3_halide -e ${HALIDE_EMIT_OPTIONS} -o ${CMAKE_CURRENT_BINARY_DIR} target=${HALIDE_TARGET}
    COMMENT "use halide generator to generate the need hexagon implementation."
    VERBATIM
)
常用类型
Halide::Tools
Halide::Tools::load_image
#include "halide_image_io.h"
// 这个tool主要是用来加载图像的,Halide的工具和opencv不同的是,其加载出来的图像是,
Halide::Buffer<uint8_t> image = Halide::Tools::load_image("2048x2048.jpg");
Halide::Buffer
halide中数据存储的格式,这里因为我们主要是在Hexagon SDK中使用halide,主要通过c的方式来设置,所以主要是使用halide_buffer_t。
对于halide_buffer_t中的halide_dimention_t dim的理解:
// 简化定义如下,主要由四个变量组成
struct halide_dimension_t {
    int32_t min;    // 定义该维度的起始索引,通常为0,但是可以是任意数值。
    int32_t extent; // 该维度的大小,即该维度包含的元素数量。
    int32_t stride; // 用于在该维度移动一步所需的步长。
    uint32_t flags; // 标记该维度的特殊属性。(不常用)
};

struct halide_type_t {
	uint8_t code; // The basic type code: signed integer, unsigned integer, or floating point.
	uint8_t bits; //The number of bits of precision of a single scalar value of this type.
	uint16_t lanes; // How many elements in a vector.
}

// 初始化案例
cv::Mat readed_image = cv::imread("./images/2048x2048.jpg");
const int image_width = readed_image.cols;
const int image_height = readed_image.rows;
const int image_channel = readed_image.channels();
cv::Mat result_image(cv::Size(image_width, image_height),
				   readed_image.type());
halide_buffer_t input_buf = {0};
halide_buffer_t output_buf = {0};
halide_dimension_t in_dims[3] = {{0, 0, 0}, {0, 0, 0}, {0, 0, 0}};
halide_dimension_t out_dims[3] = {{0, 0, 0}, {0, 0, 0}, {0, 0, 0}};

input_buf.type.code = halide_type_uint;
input_buf.type.bits = 8;
input_buf.type.lanes = 1;
input_buf.dimensions = 3;

output_buf = input_buf;

input_buf.dim = in_dims;
output_buf.dim = out_dims;

input_buf.dim[0].stride = 1;
input_buf.dim[0].extent = image_channel;
input_buf.dim[1].stride = image_channel;
input_buf.dim[1].extent = image_width;
input_buf.dim[2].stride = image_channel * image_width;
input_buf.dim[2].extent = image_height;

output_buf.dim[0].stride = 1;
output_buf.dim[0].extent = image_channel;
output_buf.dim[1].stride = image_channel;
output_buf.dim[1].extent = image_width;
output_buf.dim[2].stride = image_channel * image_width;
output_buf.dim[2].extent = image_height;

input_buf.host = (uint8_t*)readed_image.data;
output_buf.host = (uint8_t*)result_image.data;

// 对应到Generato中的Input和Output就应该为,需要注意的是因为定义的layout channel在最内部,所以调用应该是input(c, x, y)、output(c, x, y)这样。
class ResizeGenerator : public Generator<ResizeGenerator> {
public:
  Input<Buffer<uint8_t, 3>> input_image{"input_image"};
  Input<float> scale_x{"scale_x"};
  Input<float> scale_y{"scale_y"};
  Output<Buffer<uint8_t, 3>> output_image{"output_image"};
  Func bounded_inputs{"bounded_inputs"};
  Var x{"x"}, y{"y"}, c{"c"};
  void generate() {
    bounded_inputs = BoundaryConditions::repeat_edge(input_image);
    Expr src_fx = cast<float>(x) / scale_x;
    Expr src_fy = cast<float>(y) / scale_y;
    Expr m = src_fx - floor(src_fx);
    Expr n = src_fy - floor(src_fy);
    Expr src_x = cast<int>(src_fx);
    Expr src_y = cast<int>(src_fy);
    output_image(c, x, y) = cast<uint8_t>(
        round((1 - m) * (1 - n) * bounded_inputs(c, src_x, src_y) +
              (1 - m) * n * bounded_inputs(c, src_x, src_y + 1) +
              m * (1 - n) * bounded_inputs(c, src_x + 1, src_y) +
              m * n * bounded_inputs(c, src_x + 1, src_y + 1)));
  }
  void schedule() {
    // Try to use auto scheduler.
    output_image.print_loop_nest();
  }
};
Halide::Func
update definition
Halide::Func f;
Halide::Var x("x"), y("y");
// 下述式子称为"pure definition"
f(x, y) = x + y;

// 这个称为 "update definition"/"reduction definition"
// reduction definition是指:一个更新定义,可以递归的在当前位置引用函数的值。
// 以下定义都是合法的:
f(3, 7) = 34; // 相当于更新单点的数值。
f(x, y) = f(x, y) + 17; // 因为是相同位置。
f(x, 3) = f(x, 10) * f(x, 0) // 如果是修改单行的话,可以访问其他行的同列数值。
f(0, y) = f(0, y) / f(3, y) // 相似的,对于修改单列的情况也一样。

// 通常规则是:每个出现在reduction definition中的Var,不论在左手侧(left-hand side)还是右手侧(right-hand side),处在函数f定义中的位置要完全一致。比如下面式子都是合法的
f(x, 17) = x + 8; // 因为f(x, ...)符合纯粹定义f(x, y)中的x位置。
f(0, y) = y * 8; // 因为f(..., y)符合纯粹定义f(x, y)中y的位置和数量。
f(x, x + 1) = x + 8; // 因为f(x, ...)是符合的,如果x + 1的x变为y就不符合了,因为纯粹定义中y没有+1.
f(y / 2, y) = f(0, y) * 17; // 合法,因为出现y的地方符合纯粹定义f(x, y)

// 而下述则是不合法的
// f(x, 0) = f(x + 1, 0); // f(x + 1, )不符合纯粹定义f(x, y)中的x
// f(y, y + 1) = y + 8; // f(, y + 1)不符合纯粹定义f(x, y)中的y
// f(y, x) = y - x; // 左手边顺序不正确。这个属于修改纯粹定义,但是完全不符合f(x, y)
// f(3, 4) = x + y; // 自由变量出现在了右手边,而不是左手边。

f.realise({100, 101}); // 因为有个f(x, x+1)的reduction definition
compute_at
Halide::Func producer("producer"), consumer("consumer");
producer(x, y) = Halide::sin(x + y);
consumer(x, y) = (producer(x, y) + producer(x + 1, y) + producer(x, y + 1), producer(x + 1, y + 1)) / 4;
// 这里compute_at会定义producer, 在consumer用到之前,在y上计算完毕,scanline。
producer.compute_at(consumer, y);
producer.trace_stores();

consumer.trace_stores();
consumer.realize({4, 4});
consumer.print_loop_nest(); 打印如下:
打印如下:
Store producer_y.0(0, 0) = 0.000000
Store producer_y.0(1, 0) = 0.000000
Store producer_y.0(2, 0) = 0.000000
Store producer_y.0(3, 0) = 0.000000
Store producer_y.0(4, 0) = 0.000000
Store producer_y.0(0, 1) = 0.000000
Store producer_y.0(1, 1) = 0.841471
Store producer_y.0(2, 1) = 0.909297
Store producer_y.0(3, 1) = 0.141120
Store producer_y.0(4, 1) = -0.756802
Store consumer_y.0(0, 0) = 0.210368
Store consumer_y.0(1, 0) = 0.437692
Store consumer_y.0(2, 0) = 0.262604
Store consumer_y.0(3, 0) = -0.153921
Store producer_y.0(0, 1) = 0.000000
Store producer_y.0(1, 1) = 0.841471
Store producer_y.0(2, 1) = 0.909297
Store producer_y.0(3, 1) = 0.141120
Store producer_y.0(4, 1) = -0.756802
Store producer_y.0(0, 2) = 0.000000
Store producer_y.0(1, 2) = 0.909297
Store producer_y.0(2, 2) = -0.756802
Store producer_y.0(3, 2) = -0.279415
Store producer_y.0(4, 2) = 0.989358
Store consumer_y.0(0, 1) = 0.437692
Store consumer_y.0(1, 1) = 0.475816
Store consumer_y.0(2, 1) = 0.003550
Store consumer_y.0(3, 1) = 0.023565
Store producer_y.0(0, 2) = 0.000000
Store producer_y.0(1, 2) = 0.909297
Store producer_y.0(2, 2) = -0.756802
Store producer_y.0(3, 2) = -0.279415
Store producer_y.0(4, 2) = 0.989358
Store producer_y.0(0, 3) = 0.000000
Store producer_y.0(1, 3) = 0.141120
Store producer_y.0(2, 3) = -0.279415
Store producer_y.0(3, 3) = 0.412118
Store producer_y.0(4, 3) = -0.536573
Store consumer_y.0(0, 2) = 0.262604
Store consumer_y.0(1, 2) = 0.003550
Store consumer_y.0(2, 2) = -0.225879
Store consumer_y.0(3, 2) = 0.146372
Store producer_y.0(0, 3) = 0.000000
Store producer_y.0(1, 3) = 0.141120
Store producer_y.0(2, 3) = -0.279415
Store producer_y.0(3, 3) = 0.412118
Store producer_y.0(4, 3) = -0.536573
Store producer_y.0(0, 4) = 0.000000
Store producer_y.0(1, 4) = -0.756802
Store producer_y.0(2, 4) = 0.989358
Store producer_y.0(3, 4) = -0.536573
Store producer_y.0(4, 4) = -0.287903
Store consumer_y.0(0, 3) = -0.153921
Store consumer_y.0(1, 3) = 0.023565
Store consumer_y.0(2, 3) = 0.146372
Store consumer_y.0(3, 3) = -0.237233
End pipeline consumer_y.0()
produce consumer_y:
  for y:
    produce producer_y:
      for y:
        for x:
          producer_y(...) = ...
    consume producer_y:
      for x:
        consumer_y(...) = ...
Success.
store_root
告诉Halide创建一个buffer用来存储所有pipeline产生的中间值(at the outermost level)。但是如果遇上并行或者向量化,这种优化并不会生效,因为无法保证计算x, y时之前的计算已经完成(没有并行的话是能够保证的)。
// Now we'll alternate between computing the producer and consumer on a
    // per-scanline basis.
Halide::Func producer("producer_y"), consumer("consumer_y");
producer(x, y) = Halide::sin(x * y);
consumer(x, y) = (producer(x, y) + producer(x + 1, y) + producer(x, y + 1) +
				  producer(x + 1, y + 1)) /
				 4;

// Tell Halide to make a buffer to store all of producer at
// the outermost level:
producer.store_root();
// Tell Halide to evaluate producer as needed per y coordinate of the
// consumer.
producer.compute_at(consumer, y);
producer.trace_stores();

consumer.trace_stores();
consumer.realize({4, 4});
consumer.print_loop_nest();
Func::update(int)
后续在仔细看看链接,有些看不太懂了。
常见问题
如何检查生成代码是否正确启用特性
SSE41
generator 的-e 除了o,h之外在加上stmt_html,打开之后查看汇编代码中是否存在SSE相关的汇编指令,找不到intrinsics很正常(_mm..),被直接编程相关汇编指令了。常见的SSE41相关的汇编指令:
movdqa/movdqu: 加载/存储128位对齐/未对齐数据。addps/subps/mulps/divps: 单精度浮点数向量加法/减法/乘法/除法。pblendw: 16位整数的条件混合。pmaxub/pminub: 无符号字节的最大/最小值。